Showing posts with label Hocuspocusville Quilt Progress. Show all posts

Thursday, August 17, 2017

Current Projects or better Known as "Squirrel" Moments

You know you're in your happy place when you have quilted more in the past couple of months than you have in the previous year!
It's always good to rediscover your WIP/ UFO's and your stash. After all you did buy or start them because you did at one time love it...looking through the past can rekindle the passion for that project left undone or fabric unused. And boy do I have a lot of UFO's! But That will be another post, LOL

The following pics are my current projects that I am working on
In the basket is Bonnie Hunter's newest leader and ender challenge which is called "Checkerboard Rail Fence" I have made quite a bit of progress on this one already...it goes together really fast.

  
This is another Bonnie Hunter quilt called "Lazy Sunday" from her book "More Adventures With Leaders and Enders". I actually had all the blocks pieced before we left TX with the intentions of finishing the quilt once back in AZ, HOWEVER......when it came time to put it altogether my blocks were off by 1/2"!!! some how my seam guide got out of line back in TX. This is why you should always recheck your seam guide from time to time. Any ways couldn't just use the blocks as is since there is a pieced outer border on this quilt. So I had to rip out all the seams and start over.   

While all of this is going on I decided it was long over do to put those bonus triangle units to good use... so went to Bonnie Hunter's blog to search her free patterns to see what I could fine to use these units. I decided to go with "Emery's Stars"  
Here is a pic of one of the blocks, finishes at 6" square in a baby quilt.

and here is a pic of me putting together "Lazy Sunday" once I resewed the blocks with the proper seam allowance. Currently the whole quilt center is pieced and is awaiting the inner border and the outer pieced border to be sewn on.   

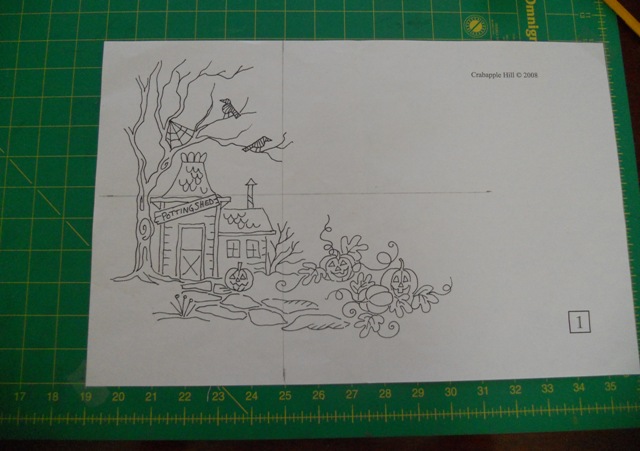
Remember this one? Hocuspocusville! I pulled it out to work on it. All of the embroideries have been done for well over a year now, just need to push it past the finish line. 
 
So I pieced the embroidery blocks together and added the outer border.
 
I even added the decorative feather stitch in purple between the blocks. I now know why the designer decided to add the black ric rac around the center of the quilt...since the center is on point the pattern over sized the setting triangles and corner triangles...so when you go to trim down the center to fit the  embroideries you end up having to cut off your points :( to get it to the proper size. I'm sure with time an patience someone could re draft the center to fit properly but hey this has been a UFO for way too long now and I want it finished! Waiting for some cooler temps to put it on the long arm to finish it off...maybe in time for Halloween 2017...fingers crossed.

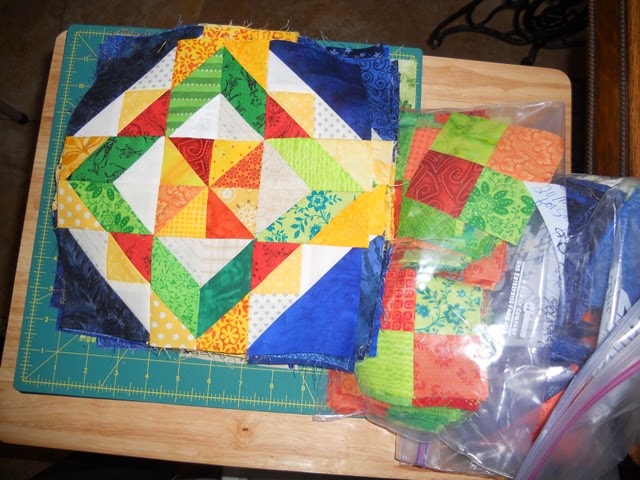
And then there is quilts that have been tugging at your heart since the first time you saw them...this is one of them. The first year I started long arming for the public one of my customers brought me the "Jewel of the Prairie" quilt that was featured in a 2005 Fons & Porter magazine. It is a Judy Martin quilt design based off of her Shakespeare in the Park Quilt. Over the past 12 years I have been wanting to make this quilt...have purchased fat quarters multiple times only to use the fat quarters in other projects. So this past month I decided why not, now is as good as time as any to get this puppy started...I ended up cutting for 2 WHOLE days!!! I hate the old school cutting directions for triangles and corner triangles that magazines use for the patterns. Thinking back it would have been a lot easier if I would have consulted a conversion chart to see what the finished unit size was suppose to end up as. If I did then I could have easily have used modern tools such as the easy angle/ companion angle rulers or even my Accuquilt Go (I have all of the die shapes needed except for the 6" finish shapes). Oh well live and learn.   
  
If you are familiar with this pattern you will understand why it has taken me so long to jump into this quilt project. It is very INTIMIDATING! with all of the cutting, not knowing finished unit sizes or how the pieces were going to fit together when you are cutting it all out...should be interesting! 

This is block one, I needed 28 that finishes at 6"  oh and if you're wondering I'm naming this quilt "Jewel of the Southwest" since I am using southwest desert colors.  
 
Then last but not least I was inspired to start a string spider web quilt, Bonnie Hunter has a great tutorial on how to do one under her free patterns tab on her blog. Since I have a lot  of Halloween fabrics (love all the bright colors) it was a no brainier to put the 2 together. My game plan is to make a king sized quilt so I can have it on my bed for the month of October (maybe not this October though, lol).

The orange that I am using is a Kona solid and the color is called "Goldfish" I have a whole bolt of it (bought it to use for cheddar quilts) in the future...   

Wednesday, July 30, 2014

Working On My UFO's

After my last post where I fessed up about my UFO's I got busy on trying to reduced the number of them. I am happy to say that I am making progress on them. Here are a few pics of what I have been up to....

This is my nephew Tommy's  memory quilt from his father's clothing.

This is my niece Kristin's memory quilt from her father's clothing.

& this is my other niece Jessie's memory quilt in progress from her father's clothing.

This is a preview of my leaders & enders split 9 patch blocks being sewn into a quilt top (will post the full pic of it when I get it quilted).

This is my Celtic Solstice Jr. quilt which I am also happy to report is now finished and is waiting to be quilted.

My hand pieced Grandmother's Flower Garden quilt that is FINALLY done (only took 5 years) and is also waiting to be quilted.

And finally yes, my Hocuspocusville Quilt is now being worked on as well. I am 1/2 way done stitching block 8 and I have traced the remaining patterns on the fabric for blocks 9,10,11,12.      

 Remember this one? I finished piecing this quilt back in 2011 but it sat, and sat waiting to be quilted...well today I quilted it!!!
  
 I quilted a panto called Spring Garland on it. Now it will wait until cooler weather so I can bind it.

Hopefully this is a sign of things to come here at Gecko Quilts, a lot more UFO finishes and reducing the spreadsheet number of UFOs...I think my word for 2015 will be UFO :0)
 

Wednesday, January 15, 2014

My List?

Every New Year it's always the same, quilters all over the world make their lists of UFO's that they plan on finishing for the year. They always have good intentions when they make them, promising themselves that this year will be different then the previous years. Just like any other (OK, most) resolutions they all start out with full steam but then after a month or two the steam starts to fizzle out.
I talk from experience, this has happen to me most years. So when people started coming out on the blogs with their UFO lists or what seems to be very popular right now their "WORD" for the year. I am just shaking my head thinking skeptical thoughts, lol. That doesn't mean that I don't have hopes of getting things done this year off my list (yes I do have a spreadsheet of projects that I would like to finish...I wouldn't be a quilter if I didn't ;0) ). But I am not going to declare that I plan on getting "X" projects done this year or that my word for the year is "?" But I do have some progress of things that I can share.

OK besides that I would like to have the binding on this one before Halloween 2014, what I would like more is to be able to locate the missing bonus triangles I got from making this quilt. I placed them in a Ziploc freezer bag, stashed them somewhere and now for the life of me can't find them :0(   
Need to turn this house upside down (maybe this summer) to try and locate them.

I have added 2 of the 4 borders that will go onto Ralph & Jess' Celtic Solstice quilt. Since I originally planned on making the king size of this quilt  but ended up only using some of the units to make it a queen size instead. I was trying to figure out what to do with the left over units. Well I figure if I just make a few more units here and there I will have enough to make the 75" X 75" version of this quilt to keep for myself. :0) I love bonus quilts!

This is block #7 of Hocuspocusville, done. Even though I don't post much lately on this progress there is some being made.

Here is block #8 started. Will it get done this year? Who knows but as long as I keep going back to it, someday the quilt will be finished.
 
  
 Here is my Grandmother's Flower Garden Quilt. I had high hopes of getting this one done last year and it would have been done if it weren't for the fact that I took bits of it apart several times because I wasn't happy with it. Now it has a better chance of getting done this year. I just need to add a few white hexie borders around the quilt to get it to the size I need. Yes it would be easier if I just appliqued the top to a non- hexie border. But I already have the hexies cut. LOL  
When I am not working on a customer quilt, I try to get some time in either piecing a top on my sewing machine or quilting one of my own tops that have been hanging around. And then at night I usually work on my hand work projects...like the Hocuspocusville quilt, the hexie quilt or maybe something new I want to learn (been wanting to teach myself hand applique)...this maybe the year.   
 
  
Oh and this project has been nagging at me to get done for the past year or so. After I made my applique Gecko wall quilt for my office, I wanted to add fabric covered wood letters above my window in the office to go with it. Well this week I finally took the plunged and cut the letters out of the fabric and modge podged them onto the letters "Gecko" for Gecko Quilts, just in case I forget where I am, lol Anyways as soon as that drys I will sand down the edges and add another coat of modge podge. Then up on the wall they go.

Even though I am not officially declaring "X" amount of projects to be finished this year I do hope to get a few more crossed off my list. As for my word for the year it is "Perseverance".


Tuesday, October 15, 2013

Hocuspocusville Update- Long Over Due

Well it's mid October 2013 and I haven't posted an update on my hocuspocusville quilt in quite a while....hmm like in over a year! I was hoping to have it done by this year but nope it's not, lol.
I did however get another 3 blocks done (blocks 4,5,6) and have just a little more stitching to do on the 7th block.

See here is the update so far on my new "quilt" design wall. The top 4 blocks have already been squared/trimmed per pattern. It's coming along.  However just like anything else UFO wise, if it sits for too long before it gets finished I start to think about other layout designs. The center was originally suppose to be alternating 9-patches on point. I didn't really care for the way the pattern had it so I came up with the center in the pic. Now (a year later) I am thinking something else that would bring in more Halloween colors to the center of the quilt. The current center won't go to waste though....it will either end up as part of a pieced backing for this quilt or I will turn it into a Halloween table topper. Stay tuned for further updates, it will get done....eventually ;0)     

Friday, May 4, 2012

Hocuspocusville Update

Making progress on my Hocuspocusville quilt...

I completed the center of my quilt. I am so glad that I decided to do the monkey wrench block instead of what was suggested in the pattern. I also have blocks 1, 2, & 3 finished and squared up and is ready for me to finish the other blocks so they can be sewn together. I am also almost finished doing the embroidery on block #4 so it was also time to transfer the designs onto the next 2 blocks...

Block 5, and

Block 6. I added 2 pumpkins to block 6 because I wanted my quilt to be balanced with the "pops" of orange embroidery that I have been adding to this quilt. After seeing the progress unfolding so far and me thinking about how I may want to quilt it when it is finished I decided that I may not do prarie points around the quilt center after all. Not quite sure what I will do yet...been thinking about piping, maybe a flange insert, or maybe just black ric rack like the pattern suggests, all I know is that it will need something to "frame" the center.  Also was thinking instead of just a plain boring outer border it might be fun to do a pieced border. Don't have a clue as to what kind or if I will do one just thinking as the process unfolds ;0).  

Sunday, April 22, 2012

Hocuspocusville Block 2 Done

Well This has been done for a few days now but been busy with "life" so I am just now getting around to posting it. I started embroidering block #3. Although it will be a while for that one to get done because I want to get a couple of my own quilts quilted and bound. Hoping to have 3 of my own done (I have alot of my own that have been ready for the longarm for over a year but no time to quilt them let alone bind them). 


Saturday, April 7, 2012

Hocuspocusville Update

So this week has been kind of crazy, I have been "Spring" cleaning the house getting it ready for Easter and the extended family to come over. Of course this is nothing compared to getting the house ready for Thanksgiving and Christmas when not only does the house get a thorough cleaning but also major decorating is going on too. Even though been super busy and no longarming has been going on I did manage to finish the first block of my Hocuspocusville quilt. Was able to work on it while running/waiting on the kids to get done with their activities and of course in the late evenings when I was too tired after the day of cleaning to do anything else.

Here's how I did block 1, I wanted to add a little color so I made the pumpkins pop with the orange.

Then I transferred the designs for block 2...

and for block 3. Should keep me busy for a while ;0)

This is what I am doing for my center blocks...instead of the 9 patch blocks on point per pattern I thought it would be fun to do a monkey wrench block in orange and black. I think it looks pretty cool so far. And if you are wondering if a gecko will be part of the quilt the answer is no, I just ran out of space on my design wall...need to find some time to get these projects completed and off the wall! LOL  

Friday, March 30, 2012

Hocuspocusville Quilt

I decided that a girl can not have too many portable projects on hand, just in case one project (like my hexie quilt) was getting boring I could jump over to another :o) This is where my Hocuspocusville quilt comes in. Remember this quilt... 


Well I had all of the stuff to make it, but stashed it away in my PTM (projects to make tub/s). Last week I was pawing my way through the PTM tubs and came across it...well lets just say I got a hugetugging at my heart to make this, like NOW!!!, you know what I am saying, right? It's like when you go to the fabric store and you see a fabric that you just have to have and even though you walk out of the store without buying it you just can't get it out of your head until you go back to buy it. Well that's what it felt like. So I pulled out my pattern. 


For anyone that wants to make it it's from Crab Apple Hill and it's pattern #313 Hocuspocusville it finishes to a size 68"X68".

The pattern suggests that you line your fabric with muslin so you don't get a shadow effect from your floss. So I cut my muslin for the 12 blocks. 

Then I cut my fabric for my blocks, I am using Moda's Essential Dots in eggshell. It is light enough that I can see the pattern through it to trace the design.


Then I taped my pattern for the first block on a flat surface (if you have a tough time seeing the pattern through your fabric you may want to use a light box for this step. Then I found my center and marked it with a pencil.

I also taped my fabric down as well so the fabric didn't shift while I traced it. To trace the pattern I used a Pigma Micron 05 black pen.

Then once the design was transfered to my fabric I basted my muslin fabric to the back of it. For this I used the basting stitch on my sewing machine in a grid like fashion then zig zag the egdes.

Then I hooped it and started stitching. The whole thing is stitched using a simple back stitch, some french knots, and maybe some lazy daisy stitches, that's all.

These are the colors I am using for my blocks, DMC #310 Black (for most of the work), DMC #720 Orange (for some occasional accent on the blocks to make them pop) and then DMC #550 Purple (for the crazy quilt type stitches that run along the seam lines of the blocks when they are sewn together). Also like I stated in the above post that I featured my customers quilt I mentioned that I was going to do something different in the center of the quilt and ditch the rick rack trim. For my quilt I am doing a monkey wrench block center in 2 colors, orange and black. And instead of the  rick rack I am planing on doing prarie points in multiple halloween colors.
The current plan is to stitch 2 or more blocks per month so I can have it on my wall in October. Stay tuned for future updates and what each of my blocks end up looking like. I am so excited!!!